Cheap Labels & Stickers: Low Minimums, Real Quality, No £50 Trap
Find out how StickerNation keeps custom label and sticker prices genuinely low — no £50 minimums, no compromise on quality, just smart production choices that…
Read article
Articles by
UK custom label printers since 2007 — 20 years hands-on experience
Sticker Nation has been printing custom labels and stickers in the UK since 2007. What began as a bedroom operation — running off small batches of address labels in the evenings after a day's work — has grown into a dedicated label printing company trusted by more than 60,000 clients.
Along the way, we've printed for brands that have gone on to launch in Waitrose and for founders who have gone on to become Dragons on Dragons' Den. We've watched first-time makers grow into established names, and in the process we've learned exactly what separates a label that sells a product from one that doesn't.
In 2016 we built our own online designer tool — a direct response to the frustrations of traditional label artwork: bleed margins, colour mismatches, and endless file corrections. That platform, refined year after year, still powers every order today. Customers design in minutes, preview their work in 3D, and submit a print-ready PDF that drops straight onto our press — no back-and-forth, no artwork chasing, no surprises.
Everything we publish in our Knowledge Base comes from nearly two decades of hands-on production experience. If you read something here, we've done it ourselves — probably hundreds of times.
Find out how StickerNation keeps custom label and sticker prices genuinely low — no £50 minimums, no compromise on quality, just smart production choices that…
Read articleDesign custom sticker sheets online in minutes — upload your images, arrange them on the sheet, and get instant pricing. No cut lines to draw,…
Read articleEverything parents need to know about labelling school equipment — from pencil cases to sports kit bags. Durable, waterproof, and easy to apply.
Read articleDiscover why durable high tack vinyl with solvent-based adhesive is the best material for company logo stickers on equipment — and what UK manufacturers need…
Read articleThe unit price is only part of what short-run labels actually cost. Here's what UK brand owners need to factor in before choosing a label…
Read articleA practical UK guide to choosing the right outdoor sticker material — from high tack vinyl for signage to safety-compliant labels for hard hats and…
Read articleFrom workshop builds to YouTube reveals — discover how high tack labels and custom stickers help makers like you brand projects and products with a…
Read articleEverything you need to know about custom service due labels — why high tack vinyl is essential, what to include, and where to order for…
Read articleEverything UK buyers need to know about ordering custom labels and stickers — materials, specs, finishes, and why choosing a professional printer matters.
Read articleEverything you need to know about sticker cut lines — what they are, why printers need a vector cut line, and how StickerNation's online designer…
Read articleNot all labels stick to drinks bottles. Find out why you need high tack adhesive for plastic bottles, and how to personalise yours for the…
Read articleDesigning custom labels doesn't have to mean hiring a designer. Compare your options — from free vector templates to ready-made designs — and choose the…
Read articleYes, some StickerNation stickers and labels can survive the dishwasher — but material choice, wash temperature, and detergent type all affect how long they last.
Read articleHigh tack labels grip surfaces that defeat standard adhesives — textured plastics, rough wood, cold glass, and more. Here's what makes them work and why…
Read articleYour label looked perfect on screen but printed differently? Here's why it happens — and exactly what to check before you send artwork to print.
Read articleWhy small brand owners should A/B test label designs on short print runs — and how a single finish or layout change can reveal whether…
Read articleAI is about to change how small brands design labels and stickers forever. Here's what's coming, why it matters, and how StickerNation is building for…
Read articleMost online sticker designers are general-purpose drawing tools with a “labels” mode bolted on. They run in your browser using colour spaces designed for screens,…
Read articlePlan your ecommerce product photography around sample labels — photograph real labelled products, A/B test designs, and only scale the winners.
Read articleShort run label printing lets small brand owners launch products, iterate designs, and keep upfront costs low before committing to mass production.
Read articleHow to create scannable barcode and QR code labels — barcode types, sizing, quiet zones, colour considerations, and testing for reliable scanning.
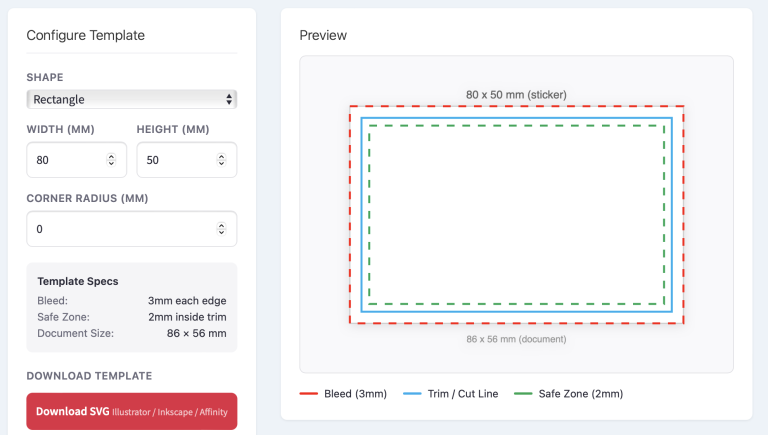
Read articleSetting up a sticker or label design file with the correct bleed, trim and safe zone can be one of the most frustrating parts of…
Read articleStep-by-step guide to designing custom stickers using an online designer — no software needed. Covers uploading artwork, adding text, choosing shapes, colour modes, and preparing…
Read articleUK guide to CBD product labelling — novel food regulations, THC content declarations, FSA requirements, health claim restrictions, and compliant label design.
Read article